Vitals Anesthesia - The Graph 2
Vitals Anesthesia - The Graph 2 BLOC 143 is an enhanced version of the original Vitals Anesthesia - The Graph BLOC 014. The graph 2 maintains most same functionality but has added additional enhancements. Major features of The Graph 2 include: the ability to quickly administer pre-configured sets of medications, document infusions, drag and drop vital signs, and a dedicated section for ventilator settings. In addition, the table at the start of the BLOC now includes a column for the total administered dose for medications and input and output. Anesthesia Events notes have been separated from the Vitals Signs grid view and given their own tab - Anesthesia Events. There is also an optional signature field at the end of the BLOC.
It is important to note one major change in The Graph 2 - Dose Unit of measure is read only for medications administered via the Graph 2. The Dose Unit of measure will default to the unit of measure selected in the Medication tab in Item Master, unless an alternate Unit of measure is selected in the BLOC Configuration.
The original Vitals Anesthesia - The Graph will still be available for use. User should note that the graphs are designed to function independently - data does not transfer between the two BLOCs. Only one of the BLOCs may be present in a workflow. If one of the Graphs is present in a workflow, it must be removed before the other may be added. The BLOC Configurations are shared between the two BLOCs, so updating one will update the other.
BLOC Header:
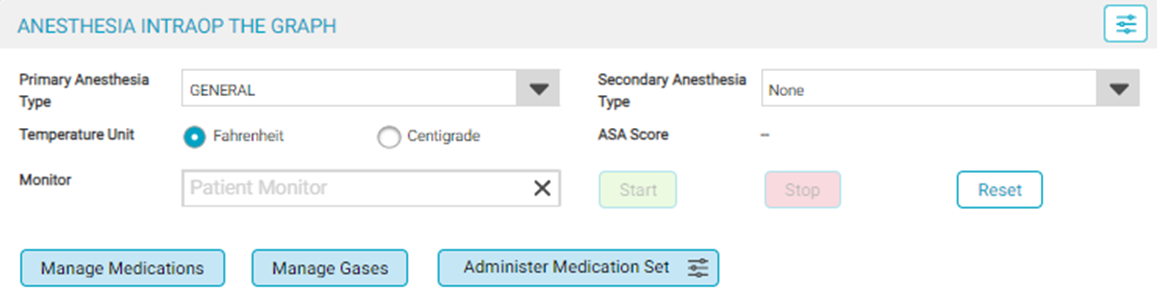
Table View:
Graph View:
Grid View:
Optional Signature Component, Signature History, and BLOC Validation:
This topic will cover the new features of the BLOC. For information on configuration settings for the Graph 2, see Anesthesia Med Sets, Anesthesia Medications, and BLOC Configuration.
Jump to:
The Table, Graph, and Grid Views
The Table, Graph, and Grid Views
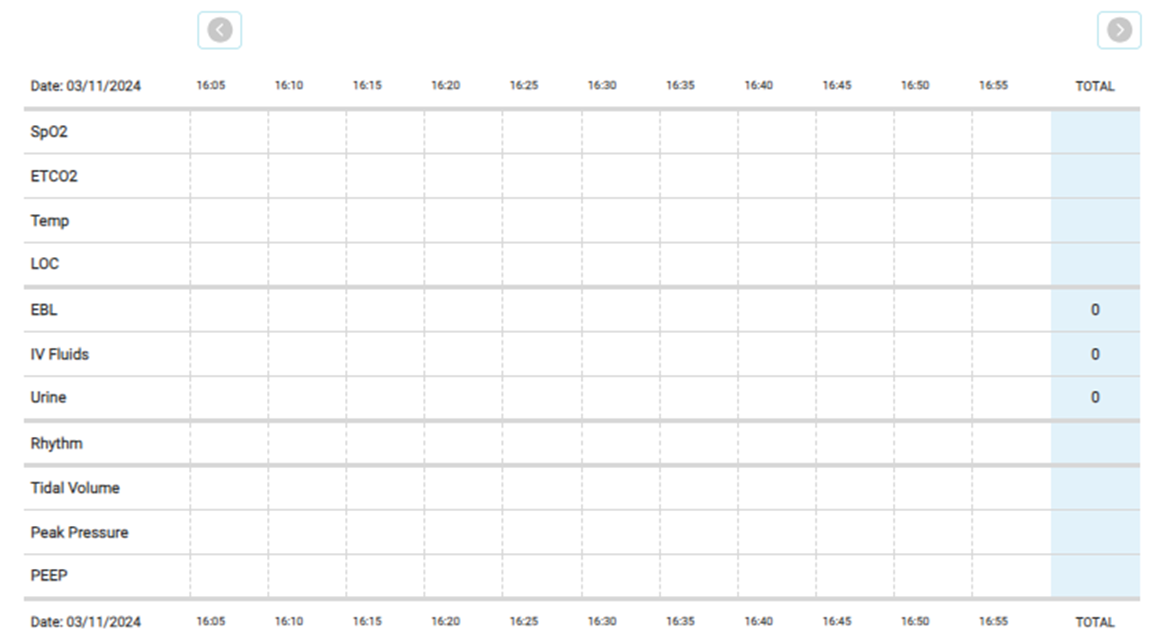
The Table
- The Table at the top of the BLOC includes rows for: gases, medications, infusions, vital signs, intake/output, EKG rhythm, and ventilator settings.
- The default gases, medications, and infusions that display are configured in BLOC configurations. The user is able to add and remove these rows by tapping the Manage Medications and Manage Gases buttons. The user is unable to change the vital signs, intake/output, EKG rhythm, and ventilator settings rows.
- Entries can be made by tapping the name in the far left column or by tapping on a cell in the table. Tapping the name will create an entry for the current time. Tapping the cell will create an entry at the time corresponding to the cell's location. For infusions, the user must tap the infusion name to create a new entry. If the Center utilizes Patient Monitor and Anesthesia Machine interfaces, gas and vital signs entries may be generated by those interfaces.
- Entries made in the Table will display in the table. They will also display in the Grid View at the bottom of the BLOC.
It is important to note that medications administered in the Grid View may not display in the Table - even if the same medication is the in the Table. This is because the Table looks at the Medication Name to determine which medications are the same. The names must be exactly the same, down to punctuation and case, for them to be considered the same. For example - if the table has a row for "fentanyl mcg" and the user administers fentanyl in the Grid View using the medication "Fentanyl mcg," that administration will not show in the Table because the medication names are different.
Also note that it is possible to administer a medication in the Grid View and select a different Dose Unit of Measure (DUOM) than what is used in the Table. If this happens, the Table will not display correctly as the different DUOM is not indicated on the Table. To prevent this issue, when administering medications in the Grid View always ensure the same DUOM matches what is used in the Table.
For the most accurate summary of all medications administered in the BLOC, refer to the Grid View.
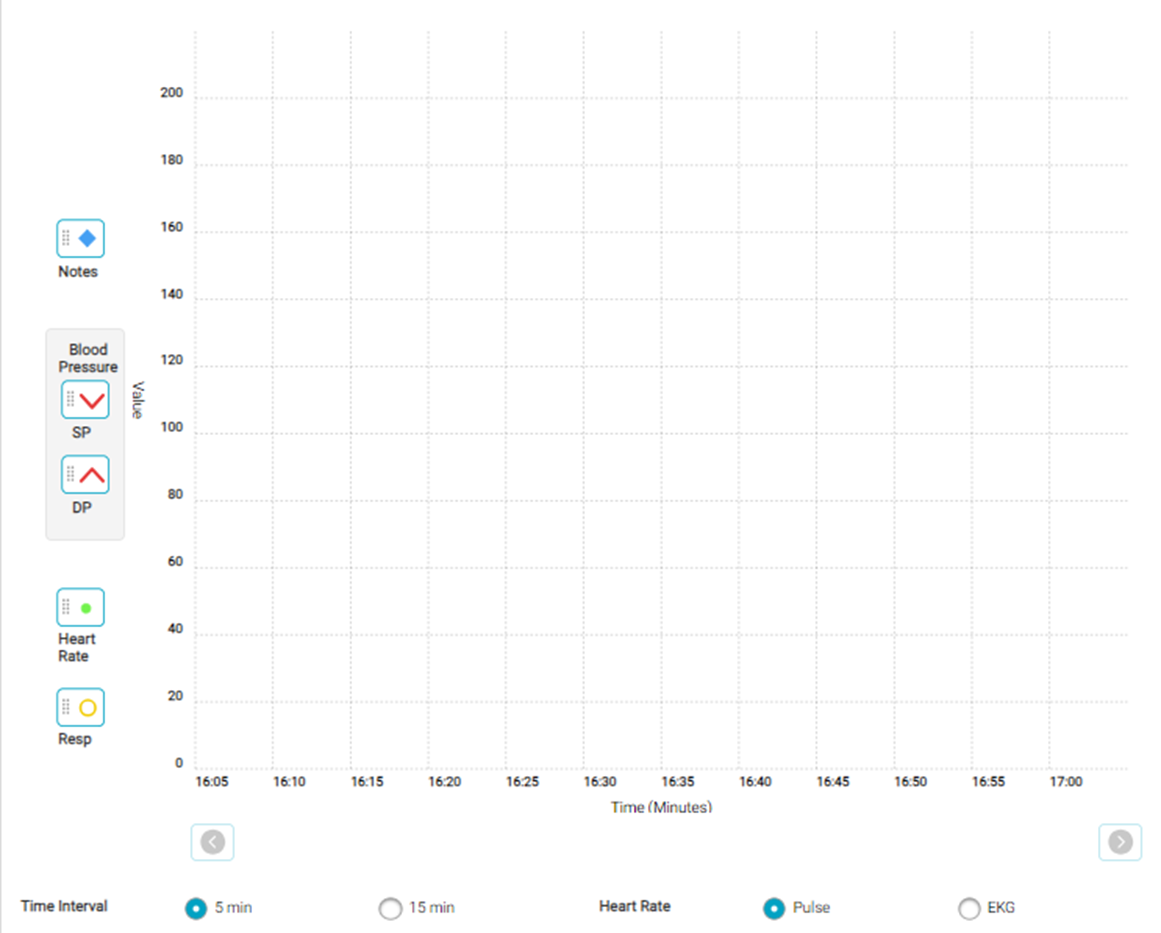
The Graph
- The Graph displays anesthesia notes, blood pressure, heart rate, and respiration. These values can be input multiple ways. They may be brought in via a patient monitor interface, the drag and drop icons, or by entering them in the Grid View.
- If the Center utilizes a Patient Monitor interface, vital signs entries may be generated by the interface. Entries can be edited by tapping the entry in the Graph or by tapping the edit icon in the Grid View.
- The user is able to configure whether the Graph displays in 5 or 15 minute increments using the Time Interval radio buttons at the bottom of the Graph.
- The user can configure whether the Graph uses the EKG or pulse as the source of the heart rate using the Heart Rate radio buttons at the bottom of the Graph.
The Grid View
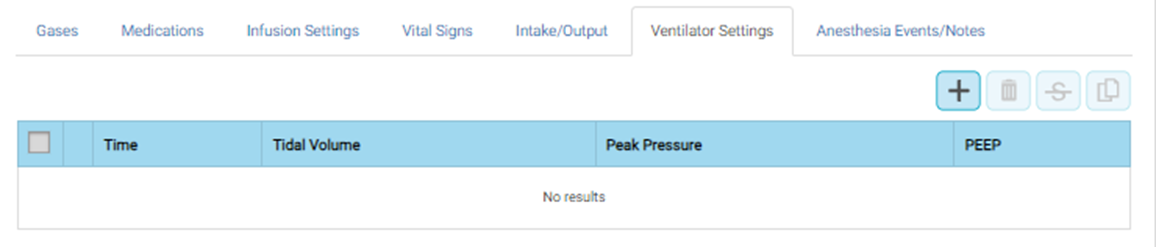
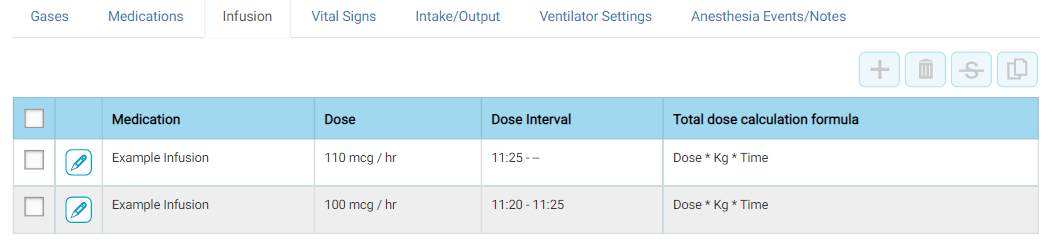
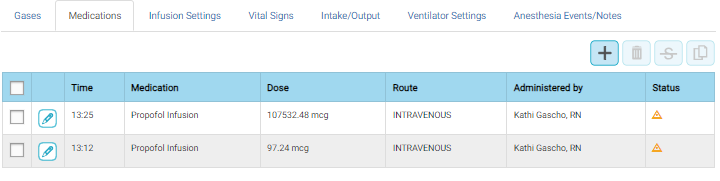
- The Grid View has different tabs for: Gases, Medications, Infusion Settings, Vital Signs, Intake/Output, Ventilator Settings, and Anesthesia Events/Notes.
- Any entry made in the Table or Graph will create a corresponding entry in the appropriate Grid View tab.
- When documenting medication administration in the Grid View if the medication being administered in also in the Table, ensure that the Dose Unit of Measure (DUOM) matches what is used in the Table. Otherwise, the Table will not display correctly, and the dose given will be misleading since the DUOM is not indicated on the Table view.
- If the Center utilizes Patient Monitor and Anesthesia Machine interfaces, ventilator and/or vital signs entries may be generated by those interfaces.
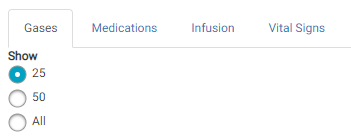
- If there are more than 25 entries in the Gases or Vitals Signs Grid Views, radio buttons will appear in those grid views. These buttons allow the user to select how many entries are displayed. The radio button will default to 25, which shows the 25 most recent entries. To view up to 50 entries, select the 50 radio button. To view all entries, select the All radio button. The radio buttons in the tabs are independent.
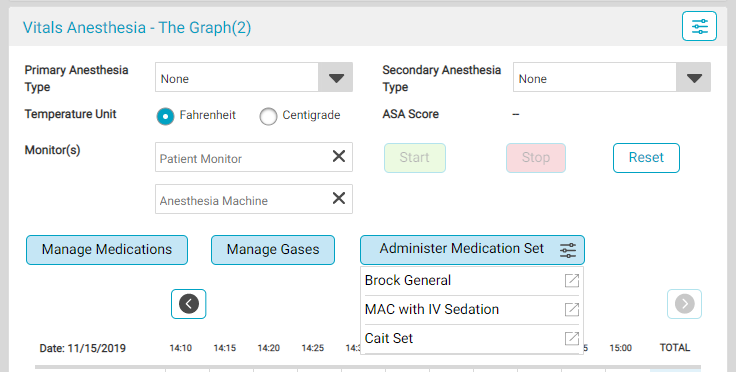
Medication Sets
Medication Sets allow the user to easily document a group of medications that are commonly administered at the same time, such as induction medications. The medications, doses, and dose increments are set up in Anesthesia Med Sets in HST eChart Admin Home. See Anesthesia Med Sets for instructions on configuring sets.
To administer a Medication Set:
- Tap the Administer Medication Set button in the BLOC. This button is located adjacent to the Manage Medications and Manages Gases buttons. A drop-down will appear displaying all active Anesthesia Medication Sets.
- Tap the desired set.
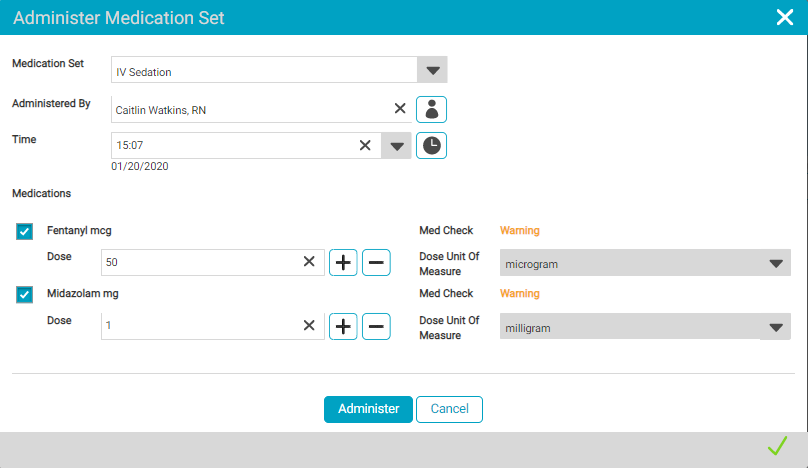
- The Administer Medication flyout will appear. If the wrong set was accidentally selected, the set may be changed by selecting a different set from the Medication Set drop-down.
- The Administered By and Time default the logged in the user and the time at which the button was tapped. Adjust these fields as needed.
- If necessary, adjust the Dose for the medications.
- If a medication in the set is not to be administered, uncheck the medication.
- When done, tap the Administer button. If the administered medications are present in the Table, and the medication names match exactly, they will appear there. The administered medication will always display in the Grid View.
- NOTE: Infusions are not supported in Anesthesia Medications Sets
Drag and Drop Vital Signs
Users now have the ability to document respiration, heart rate, blood pressure, and notes via drag and drop icons.
To document respiration or heart rate, tap and drag the appropriate icon onto the graph. While dragging the icon, a call out above it will indicate the time and value for its current location on the graph. When the icon is at the desired time and value, release the icon to complete the documentation. The heart rate will be recorded as Pulse or EKG dependent upon which Heart Rate source radio button is selected for the BLOC.
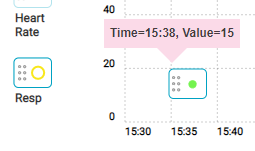
The process is similar for documenting blood pressure. The only difference is that blood pressure is documented using two icons, SP and DP. The icons are dragged and dropped independently, and it does not matter which is placed first. Both icons must be placed on the graph for the vital sign to be recorded.
Notes are documented by dragging the notes icon to the desired time on the graph and releasing it. A value will display in the call out above the icon while it is dragged, but it is not recorded. After dropping the note icon in the desired spot, tap the maker to enter the note.
Infusions
Users are able to document ongoing infusions in The Graph 2. For a medication to be documented as an infusion, it must first be added to Anesthesia Medications and marked as an Infusion Medication. The Vitals Anesthesia -The Graph 2 BLOC must then be configured to include the infusion for all applicable Chart Templates. See Anesthesia Medications and BLOC Configuration for further instructions on this process.
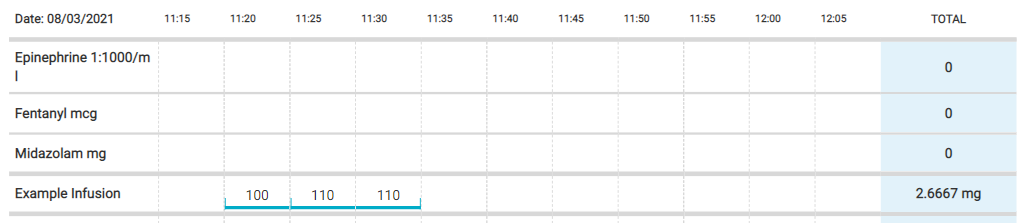
Infusions are included in the Table and are visually separated from standard dose medications by bold table lines. When an infusion is or was running, the infusion dose will display in the appropriate time cells on the table and a blue line appears at the bottom of the cells. Infusion start and stop times are indicated on the blue line using vertical hash marks.
Infusions also appear in the Medication and Infusion Settings Grid Views at the bottom of the BLOC.
The Infusion Settings Grid View displays the medication, rate, rate interval, and total dose calculation formula. If an infusion is run at more than one rate/dose there will be a separate row for each one.
Infusions cannot be initiated from the Grid View. The Grid View is only used to edit documentation. If a row is struck through in the Infusion Settings Grid View, the corresponding row in the Medications Grid View will also be deleted.
The Medication Grid View displays all medication administrations documented from the BLOC, including infusions. If an infusion ran at more than one dose, the total administered dose for each dose will display as a separate row. A user may manually update and override a calculated total administered dose in the Medications Grid View. The ongoing dose for active infusion will update in the Table and Grid View approximately every four minutes.
Initiate an infusion:
Infusions can only be initiated from the Table.
- Tap the infusion medication name on the table. The Infusion Medication Administration flyout will appear.
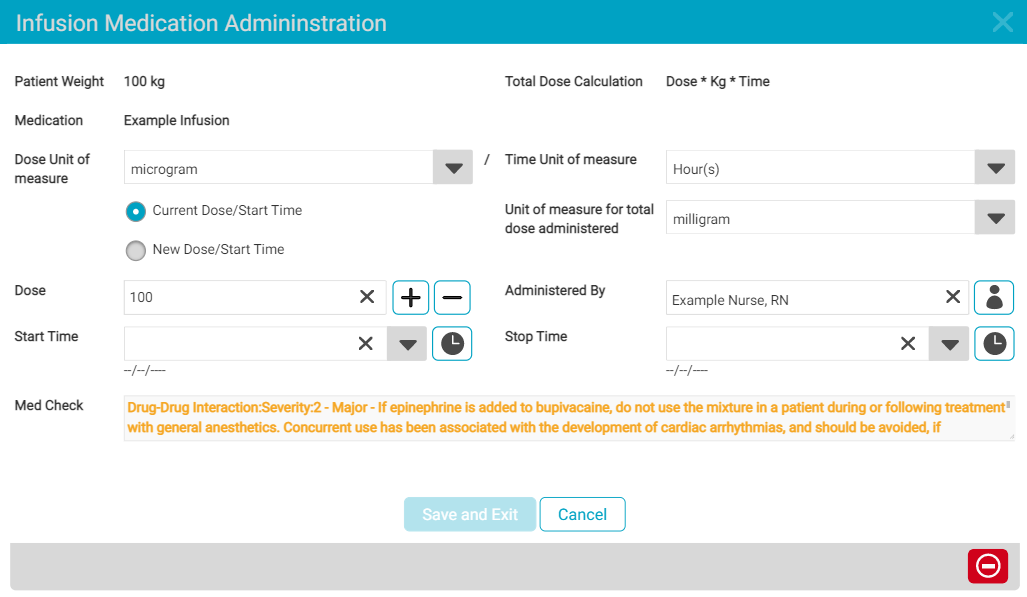
- The Current Dose/Start Time radio button will be selected by default.
- The patient weight, total dose calculation method, and medication will appear as read only in the top of the flyout. Confirm this information is correct. Once the infusion is started, the patient weight used to calculate the dose will be "locked' at this value. Even if the weight is updated later in eChart, the dose will still be calculated with this value.
- The Dose Unit of Measure, Time Unit of Measure, Unit of measure for total dose administered, and Dose will populate based on the settings in the BLOC configuration for that chart template. The fields can be changed as desired.
- The Administered By field defaults to the logged in user.
- Select the infusion start time by tapping the Clock Icon or entering a different time.
- Once done, tap Save and Exit.
Edit an infusion:
The following steps should be used edit the dose or start time of an infusion. An infusion can be edited from the Table or the Infusion Grid View.
From the Table:
- Tap the infusion medication name on the table or tap a cell in the table where the infusion is running. The Infusion Medication Administration flyout will appear.
- The Current Dose/Start Time radio button will be selected by default. Do not change this selection.
- Edit the Dose field and/or Start Time as necessary. Dose Unit of measure, Time Unit of measure, and Unit of measure for total dose administered may not be edited after an infusion is started.
- Tap Save and Exit.
From the Infusion Grid View:
- Tap the edit button for the infusion which is to be edited. The Infusion Medication flyout will appear.
-
Edit the Dose field and/or Start Time as necessary.
- Tap Save and Exit.
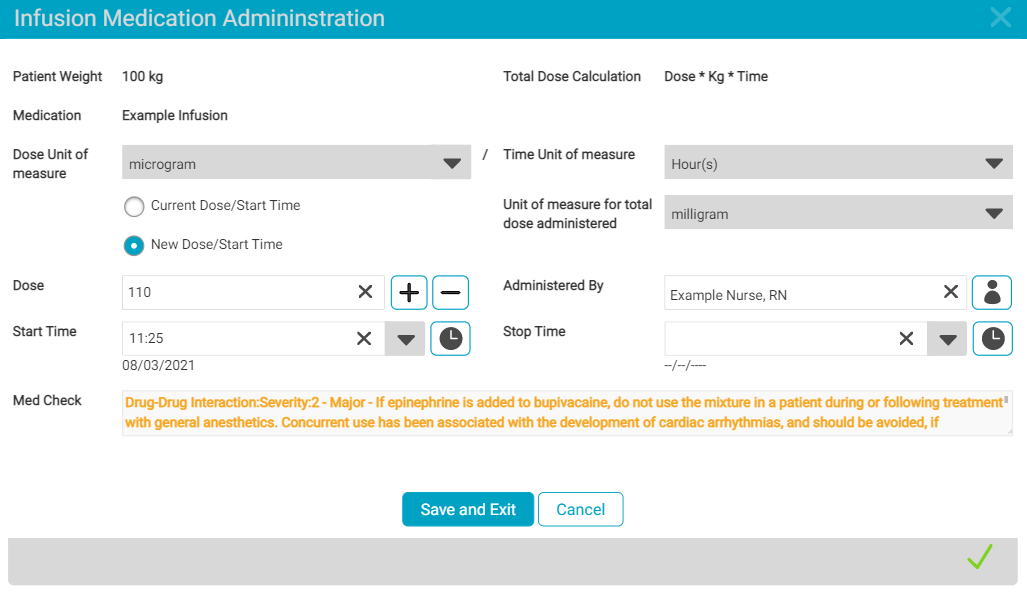
Change an ongoing infusion to a new dose:
The following steps should be used if an ongoing infusion is changed to a new dose/rate. Documenting a new dose/rate can only be done from the Table.
- Tap the infusion medication name on the table or tap a cell in the table where the infusion is running. The Infusion Medication Administration flyout will appear.
- Select the New Dose/Start Time radio button.
- Complete the Dose Field
- The Start Time will default to the current time. Edit the time as needed.
- Tap Save and Exit.
To stop an infusion:
Infusion medications may be stopped from the table or the Infusion grid.
To stop an infusion from the table:
- Tap the name of the ongoing infusion. The Infusion Medication Administration Flyout will appear.
- Enter the Stop Time.
- Tap Save and Exit.
To stop an infusion from the grid view:
- Tap the edit icon for the infusion.
- Enter the Stop Time.
- Tap Save and Exit.
Ventilator Settings
The ventilator settings Tidal Volume, Peek Pressure, and PEEP are now included in the table and in the Ventilator Settings grid view. They can be documented from and will display in both locations.
To document a ventilator setting from the table:
- Tap the text for any of the ventilator settings. The Ventilator Settings flyout will appear, which contains fields for all three ventilator settings.
- Enter the time.
- Document the ventilator setting(s).
- Tap Save and Exit or Save and Add New.
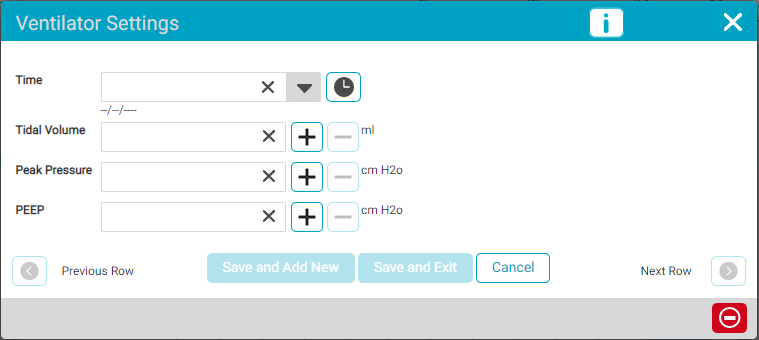
To document a ventilator setting from the grid view:
- Tap the Ventilator Settings grid view tab.
- Tap the Add button
- Enter the time.
- Document the ventilator setting(s).
- Tap Save and Exit or Save and Add New.
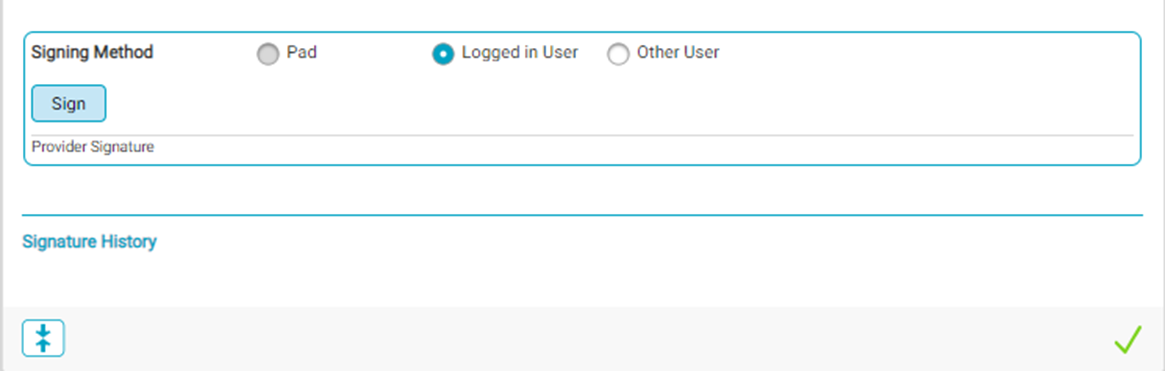
Signature
The Signature is not required for BLOC completion. Multiple providers may sign the BLOC.
The signature was added as some anesthesia billing companies require the signatures on the graph for all participating providers. The signature also allows a way to document providers without utilizing the Staff BLOC.